How can you create a Project with a custom frame size in Final Cut Pro X?  Watch this video to see how you can set any resolution for a project.

You can also select standardized formats such as 4K, 4:3, and many more via the Format drop-down menu.


The version of Final Cut Pro X used in this tutorial is 10.2.1.

For more from Bascomb Productions, subscribe to the YouTube channel or subscribe via Twitter.


Copyright 2015 - Bascomb Productions

Posted
AuthorBascomb Productions


Editing is a process.  Developing your edit in stages gives you the ability to reach goals, to reflect and to iterate.  It’s important to have a creative process like this in order for your video to be all that it can be.

Keeping the versions of an edit organized can be cumbersome, but here is a method and a naming convention that can help with project organization in Final Cut Pro X.


Stages

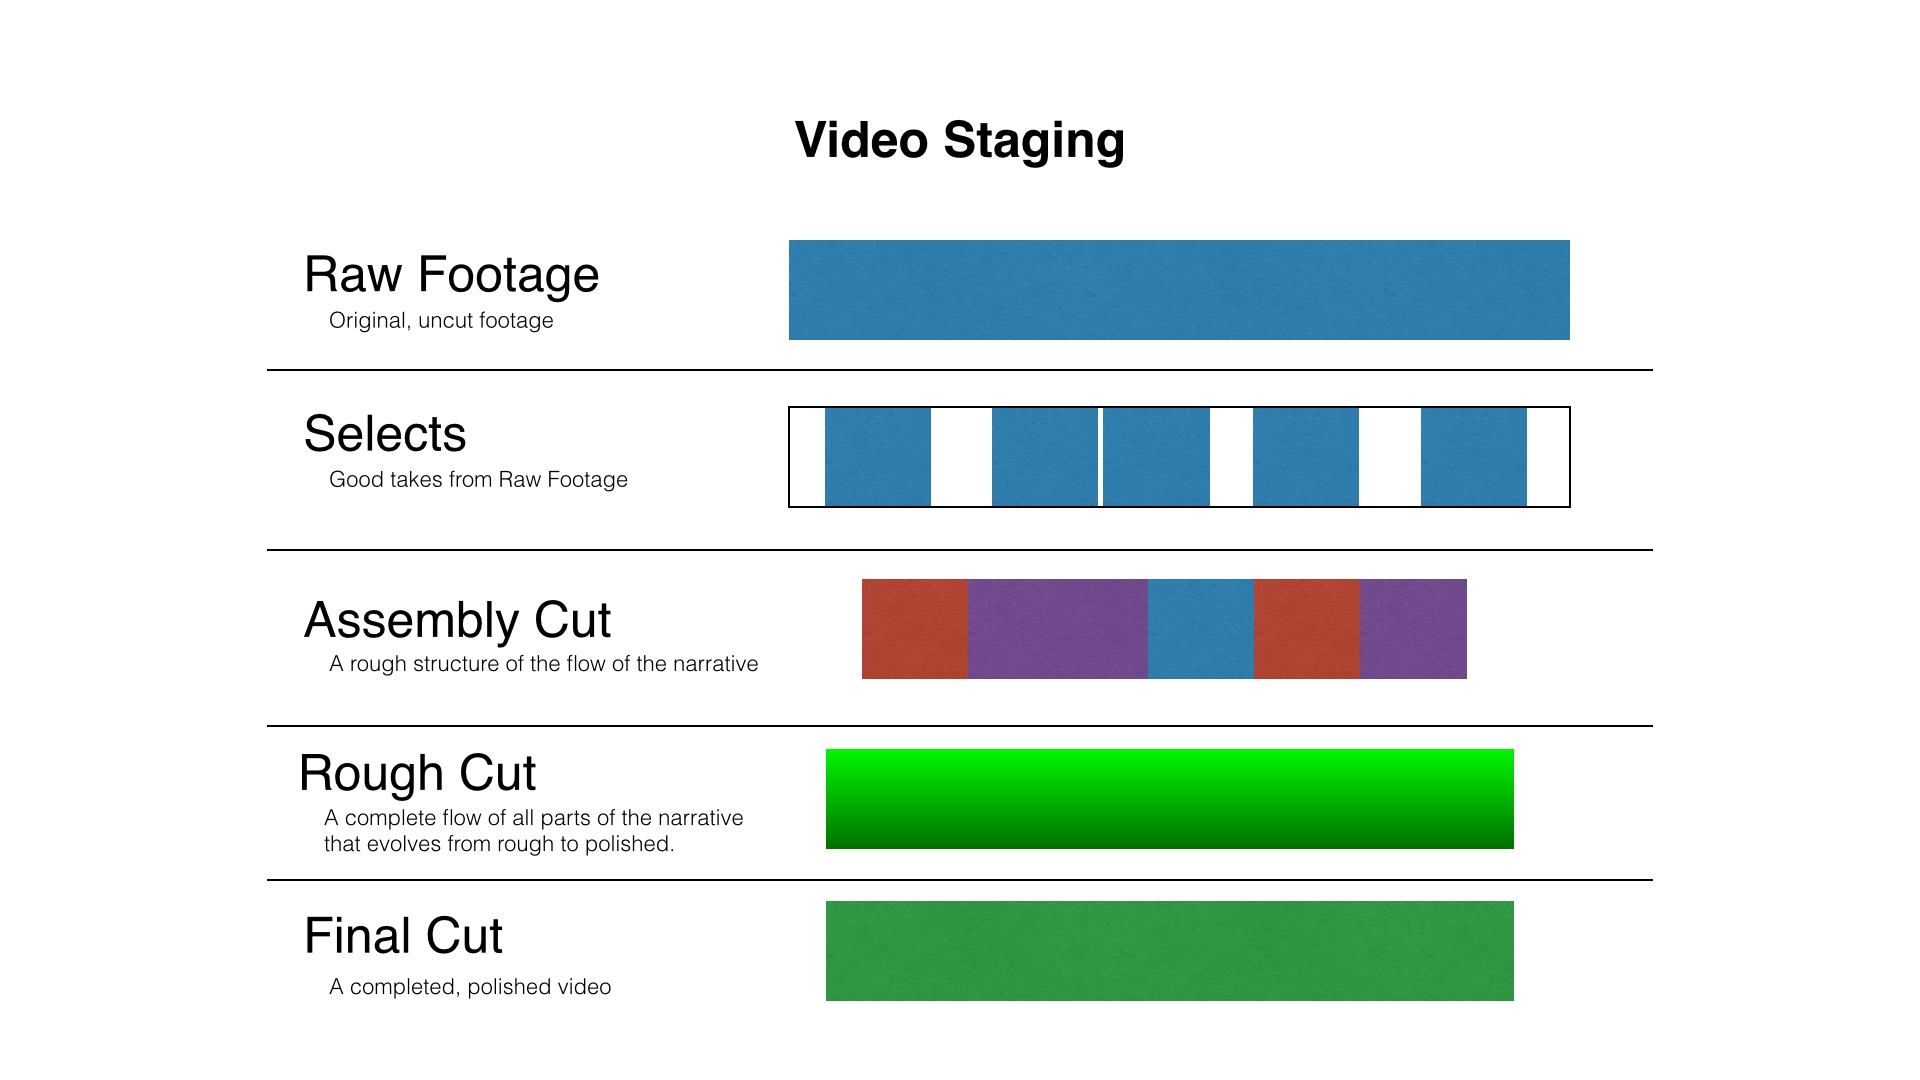
Let’s consider some possible stages for a medium sized project where the workflow needs approval by a client at different stages in development:


Raw Footage - The Raw Footage stage is where footage is unorganized and is in its original, uncut state for a project.  This is the starting point that every editor faces: the raw ingredients.

Selects - The Selects stage is where you select the usable pieces and good takes from the Raw Footage.  This stage is about thinning down what you have to work with.

Assembly Cut - The Assembly Cut stage is a rough structure of the flow of the project’s narrative.  If you’re doing a video where interviews drive the narrative, this is a cut that puts together only your interview clips and allows you to build the major structure of the story.

Rough Cut - The Rough Cut stage is a complete flow of all parts of the narrative.  The Rough Cut builds upon the Assembly Cut by taking your core story and growing it into a rich and layered video.  The rough cuts will contain place holders or temporary elements of additional footage, animation and music.  As a rough cut evolves, elements become finalized.  The Rough Cut stage is about refinement 

Final Cut - The Final Cut stage is a complete, polished video and is ready for review and approval.


Approvals and iterations happen within each of the three stages of cuts.  Once you get the main structure of your video in place (the Assembly Cut), you move to making that structure a refined and rich experience.(the Rough Cut)  Once you have refined your cut to the point it feels done, you create a final candidate.(the Final Cut)  Each stage can have multiple versions.

Like any process, you may reach points where you have to step backward to go forward.  If you find that a Rough Cut is not working like you hoped, you may need to step back to an Assembly Cut and work on the main structure of your story to fix issues that you may have.


Project Naming Convention

With these video stages in mind, you can apply a standard naming convention to the timelines you create.

The convention I use is Letter + Number followed by Stage.  Project timelines get names such as “A4 Assembly”, “R8 Rough” and “F4 Final”.

The parts of the convention are defined as:
Letter = A for Assembly, R for Rough Cut, F for Final Candidate
Number = 1, 2, 3, etc. (the version)
Stage = Assembly, Rough or Final

For example, if you’re working on your fifth rough cut of a video, the project would be named “R5 Rough”.  While having both “R” and “Rough” in the title for identification seems to be redundant, its need becomes obvious when sorting your projects in Final Cut Pro X.


Smart Collections in Final Cut Pro X

In Final Cut Pro X, Smart Collections are filters that allow you to focus in on just the elements that you want to see from the total set of media in your project.

Think of it like email organization: an old approach was to let the user organize their emails by sorting emails into folders; a modern approach is to put all of your emails in to one location and search on what you need.

The same goes for elements in Final Cut Pro X Events: there are no defined “folders” or “buckets” to organize your content into; Rather, there is one bucket and you create filters to see what you want.

To organize the versions of your cuts, you can create Smart Collections based on the name of the stage of the Project.  You will first filter by “Type” to show you Projects.  Then, you will filter by text in order to see the cuts you want.  If you want to see all of your Assembly cuts, filter by text that includes “Assembly”.  Repeat this for “Rough” and “Final” and you’ve got a quick way to see and organize the different cuts of a project.
Posted
AuthorBascomb Productions
2 CommentsPost a comment

Being able to edit video projects where the project elements are in the cloud has seemed like an unrealistic goal for all but very high end productions… until now.  Improvements in internet connection speeds and cloud storage have risen to a level where editing and syncing small projects stored in the cloud is possible.

This is not a perfect system and it has not been thoroughly tested, but if this system suits your needs, it could be an exciting first step towards online collaboration between video editors.

The key to accomplishing the collaboration is having a Final Cut Pro X library shared via Dropbox between editors and having that library’s cache stored locally for each editor.  In other words, the editing database and original media are stored in the cloud, but render files are stored locally.

Note: This workflow could also be done with the original media being stored locally as well (each editor having a copy of the original media on a local drive), but a goal of this is to store the original media in the cloud.


THE GOALS

  • Collaborate on a Final Cut Pro X editing project where the editors are in different physical locations.
  • Backup the original media and the project database to cloud storage.


REQUIREMENTS

  • Final Cut Pro X
  • Cloud storage that syncs and shares between editors.  Dropbox’s Pro plan with 1TB of storage is an excellent solution for this.
  • Only one editor can work on a FCP X library at a time.  In order to know who is currently editing the library, use Finder labels to identify if it’s safe to open the library or not.  Use red for “In Use” and green for “OK to open”.


WORKFLOW

Here are the steps to this workflow:
1. Setup a folder in Dropbox that is shared between editors.
2. Create a Final Cut Pro X library in this Dropbox folder.
3. Setup the Final Cut Pro X library as a Managed Media library.(in other words, the imported media will be stored within the library and will therefore be synced to Dropbox)
4. Setup the Final Cut Pro X library to use local cache.  When other editors open the library, they will need to set this for their system.
5. One editor can import media and begin editing.  This first editor will need to allow time for Dropbox to sync the media to its servers.
6. When work on the project is done, the editor will need to close the library.  Once the library is closed, change the Finder label of the library file to green to indicate that another editor may open.

After this initial setup is done, each editor will need to follow and repeat the steps below for cloud collaboration:
1. Sync all files from the Dropbox folder for the project.
2. Before opening the library, change the Finder label of the library to red.
3. Open and edit the Library.
4. When finished with editing, close the library and change the Finder label to green.


Note: You will also need to share/sync any custom Motion Templates that are used in the project.


BENEFITS

  • Collaboration between editors is possible if the editors follow the rules of checking a project in and out.
  • The Final Cut Pro X library and original media is backed up in the cloud, providing extra insurance for project recovery should disaster strike.


CONSTRAINTS

  • There are two major constraints, both of which will improve in the future given better technology: the speed of your internet connection and the amount of available cloud storage.
  • The amount of time it takes to upload/download the original media for a project could be significant given a slow connection speed.
  • Depending on the size of your project, 1 TB of Dropbox space may not be enough space to store your raw media.


THINGS TO LOOK OUT FOR

This workflow is not without its potential hurdles.  Sharing and rendering may fail according to an article by Apple.  Click here to read the article as well as an easy fix in case you run into issues.


For more from Bascomb Productions, subscribe to the YouTube channel or subscribe via Twitter.

Copyright 2014 - Bascomb Productions

Posted
AuthorBascomb Productions
3 CommentsPost a comment

How can you delete all of the proxy media for all of a Library’s Projects and Events in Final Cut Pro X?  Watch this video to see how you can free up disk space on your Mac by clearing out Final Cut Pro X's proxy media in version 10.1.2.

By deleting a Library's proxy media, all of the proxy media for all of the projects in the library are deleted.  To be more selective, you can also delete the proxy media of an Event instead of a Library.

To delete proxy media in Final Cut Pro X 10.1 or 10.1.1, review this page.


For more from Bascomb Productions, subscribe to the YouTube channel or subscribe via Twitter.


Copyright 2014 - Bascomb Productions

Posted
AuthorBascomb Productions

How can you delete all of the render files for all of a Library’s Projects and Events in Final Cut Pro X?  Watch this video to see how you can free up disk space on your Mac by clearing out Final Cut Pro X's render files in version 10.1.2.

By deleting all of a Library's render files, all of the render files for all of the projects in the library are deleted.  To be more selective, you can also delete the render files of an Event instead of a Library.

To delete render files in Final Cut Pro X 10.1 or 10.1.1, review this page.

To delete render files in Final Cut Pro X 10.0 to 10.0.9, review this page.


For more from Bascomb Productions, subscribe to the YouTube channel or subscribe via Twitter.


Copyright 2014 - Bascomb Productions

Posted
AuthorBascomb Productions

Final Cut Pro X is ready to edit 4K video, but how do you find additional content that is also 4K ready?  Watch this video to see how you can easily filter to see which content is ready for 4K projects in Final Cut Pro X.

In order to see the "4k-ready content only" checkbox, you must have a 4K project opened.  If you have an HD project or lower resolution project opened, you will not see the 4K checkbox.


For more from Bascomb Productions, subscribe to the YouTube channel or subscribe via Twitter.


Copyright 2014 - Bascomb Productions

Posted
AuthorBascomb Productions

Do you need to export a frame out of a project in Final Cut Pro X?  Watch this video to see how you can easily setup a Destination for quickly exporting an image from your movie.

Do you need to export a frame into a format other than JPEG?  You can also export into the following formats:

  • TIFF File
  • PNG Image
  • Photoshop File
  • Open EXR
  • DPX Image
     

For more from Bascomb Productions, subscribe to the YouTube channel or subscribe via Twitter.


Copyright 2014 - Bascomb Productions

Posted
AuthorBascomb Productions

Do you need to centralize the location of all of the video clips, audio clips and images for your video project?  Watch this video to see how you can consolidate a library in Final Cut Pro X 10.1.

For more from Bascomb Productions, subscribe to the YouTube channel or subscribe via Twitter.


Copyright 2014 - Bascomb Productions

Posted
AuthorBascomb Productions

Need to know how to get rid of all of your transcoded media in Final Cut Pro X?  Watch this video to see how you can free up disk space on your Mac by clearing out Final Cut Pro X's transcoded media in version 10.1.  This will remove both proxy media and high quality (or optimized) media from your Event.

For more from Bascomb Productions, subscribe to the YouTube channel or subscribe via Twitter.


Copyright 2014 - Bascomb Productions

Posted
AuthorBascomb Productions

Need to know how to get rid of proxy media in Final Cut Pro X?  Watch this video to see how you can free up disk space on your Mac by clearing out Final Cut Pro X's proxy media in version 10.1.

For more from Bascomb Productions, subscribe to the YouTube channel or subscribe via Twitter.


Copyright 2014 - Bascomb Productions

Posted
AuthorBascomb Productions


Why Archive?

Why do we archive a video project?  We archive a project in case we ever need to restore the project.  That leads to a natural follow-up question: why would we ever need to restore a project?  There are two reasons: we may need to re-export a project or we may need to make changes to a project.

So, what do we archive from all of our work on a project?  We archive whatever we need to restore the project at a later date as well as any reference material that is important to keep.(such as editing notes, graphical files and fonts)  We also want to organize everything in such a way that it’s easy to find things again in the future.

For Final Cut Pro X 10.1 and higher, what elements do we need to archive?  The elements can be broken down as follows:

  • Libraries - Libraries consist of all of your Events.  Events consist of all of your raw media (video files, audio files, still images) as well as your Projects (the editing timelines).
  • Motion Templates - Custom Transitions, Titles, Transitions, and Generators
  • Associated Files - Document Files, Graphic Files, Fonts and other other files deemed appropriate

When archiving, you can consider not backing up your original media with the Final Cut Pro X project archive.  Why?  If you have the original media (perhaps on an SD card) and if it can easily be reimported or relinked, you can save the physical media and choose to restore it at a later time.  This is a good way to make efficient use of your storage if your work contains a lot of high-resolution video footage.  For projects that have a smaller amount of video footage, you could archive it with everything else.  It’s a choice between how big you want the file size of the archive to be and how easy you want a restoration to be.

Where do we archive all of these files?  Two good options to consider when archiving your work are disk drives and network based storage.(Dropbox, for instance)  Like any digital backup/archiving plan for important materials, you’ll want redundancy and you’ll want multiple locations.


How to archive in Final Cut Pro X

Now that we've established the "why" of archiving, let's dive into the "how" of archiving our work in Final Cut Pro X.  This workflow is based on the current version of Final Cut Pro X, which as of the publishing time of this article is version 10.1.

One note before we begin: Projects (capital P) refers to a Final Cut Pro X timeline whereas projects (lowercase p) refers generically to the complete effort in creating a video.

To archive, you’ll need to do some work in Final Cut Pro X and in the Finder.  Let’s start by doing the prep work in Final Cut Pro X.  Note: This article has been updated for a Final Cut Pro X 10.1.3 workflow.

1. Delete all render files from your Library

  • There’s no need to save your project’s render files as they can easily be re-rendered.  These files are large and will substantially save space in what you will need to archive.  Check out this video to see how to delete your render files in your Library.  If you delete all render files in a Library, it will delete all of the render files for all of the Events and the Projects in that Library.
     

2. Delete Transcoded Media (Optimized/Proxy media)

  • You will want to delete the transcoded media that you used to improve playback performance either as Optimized Media or Proxy Media.  You’ll need to use the Finder to delete all of this transcoded media.  Watch this video to see how you can easily delete the Transcoded Media.(You will also need to select the Optimized Media checkbox as well.)
     

3. Consolidate your Library

  • This command will centralize all of your media into the location that you specify.  In a simple scenario, you will want to consolidate the media into the library that you are archiving.  It will bring a copy of any media that was linked externally into your library.  This could take up a lot of disk space depending on the amount of media.  To consolidate a library, follow the steps in this video.
     

4. Delete restorable media (optional)

  • For media on memory cards or other physical media that you can easily re-capture or re-link later, delete the Original Media in the Library.  You’ll do this in the Finder in the same way that you deleted the Transcoded Media.  However, you will delete *only* the media in the Original Media folder that you know that you can easily restore.
     

5. Close the library

  • Close the library within Final Cut Pro X by control-clicking the Library and selecting the close library option.


Now, let’s move to the Finder to do the rest of the archiving work.


6. Create an Archive folder

  • In the Finder, create a folder at the location you wish to archive (for example, an external hard drive or network/cloud drive) to hold everything in your project.
     

7. Copy your Library file to the Archive folder

  • Locate the Final Cut Pro Library file and copy it to the Archive folder that you just created.  Depending on the size of the file, this may take a while.
     

8. Copy Motion Templates (Transitions, Titles, Transitions, Generators)

  • This is the hardest part of the current workflow for archiving.  It is particularly difficult given that you can’t necessarily just go to the separate sub-folders of the Motion Templates and copy them over.  You could potentially have referenced custom templates across many sub-folders.  It can get messy quickly.  There are two ways to handle this:
    • Copy only the Motion Templates that you used - This approach is easy if you gave all of your custom motion templates a category when they were published.(for instance “Bob’s Project”)  Then, you can find the “Bob’s Project” folders within each of the Motion Templates sub-folders to copy.  If you ever need to restore projects with this approach, you can copy these custom Motion Templates back in their corresponding location.
    • Copy all of the Motion Templates - You can archive the entire Motion Templates folder to make sure you have everything that was used in a project.  This will be a simple approach, but could also take up more space than is needed.  If you ever need to restore projects with this approach, you'll want to be careful that restoring these templates does not overwrite other templates that have been created since the archive was created.
  • Your Motion Templates folder is always located in the User’s “Movies” folder.  To archive these elements, create a Motion Templates folder in the Archive folder and copy everything there.   You’ll want to adhere to any distribution rights regarding moving third party templates around.

9. Backup Associated Files - Within the Archive folder, create a folder or folders for all of your associated files.  This could include:

  • Word/Pages/Numbers/Keynote/Powerpoint Documents
  • Photoshop/Pixelmator files
  • Fonts


NOTE: For archiving your work in Final Cut Pro X 10.0.9 and earlier, please refer to this article.


For more from Bascomb Productions, subscribe to the YouTube channel or subscribe via Twitter.


Copyright 2014 - Bascomb Productions

Posted
AuthorBascomb Productions
4 CommentsPost a comment

Need more hard drive space?  Watch this video to see how you can free up disk space on your Mac by clearing out Final Cut Pro X's render files in version 10.1.

When you delete all of an Event's render files, you will delete the render files for the projects contained within that Event.  This is new to version 10.1 with its implementation of Libraries as the container for both Events and Projects.


For more from Bascomb Productions, subscribe to the YouTube channel or subscribe via Twitter.


Copyright 2013 - Bascomb Productions

Posted
AuthorBascomb Productions

If the Final Cut Pro X user interface gets changed in the next major version, perhaps the light switches, which allow you to change various settings, will morph into the filmstrip icon that iMovie for Mavericks now uses.  Check out the screenshot below... perhaps it's a sneak peek into Final Cut Pro X 10.1?

NewLightswitch.jpg

For more from Bascomb Productions, subscribe to the YouTube channel or subscribe via Twitter.


Copyright 2013 - Bascomb Productions

Posted
AuthorBascomb Productions


[UPDATE: This article refers to archiving in Final Cut Pro X 10.0.9 and earlier.  To see how to archive in Final Cut Pro X 10.1 and later, please see this article.]


Why Archive?

Why do we archive our video projects?  We archive our projects in case we ever need to restore the project.  That leads to a natural follow-up question: why would we ever need to restore a project?  There are two reasons: we may need to re-export a project or we may need to make changes to a project.

So, what do we archive from all of our work on a project?  We archive whatever we need to restore the project at a later date as well as any reference material that is important to keep.(such as editing notes, graphical files and fonts)  We also want to organize everything in such a way that it’s easy to find everything again in the future.

For Final Cut Pro X, what elements do we need to archive?  The elements can be broken down as follows:

  • Events - In other words, this is all of the raw media.  This could include video files, audio files (music, sound effects, voiceovers) and still images.
  • Projects - The editing choices, or Timeline, of your work.
  • Motion Templates - Custom Transitions, Titles, Transitions, and Generators
  • Associated Files - Document Files, Graphic Files, Fonts and other other files deemed appropriate

When archiving, you can consider not backing up your original media with the Final Cut Pro X project Archive.  Why?  If you have the original media (perhaps on an SD card) and if it can easily be reimported or relinked, you can save the physical media and choose to restore it at a later time.  This is a good way to make efficient use of your storage if your work contains a lot of high-resolution video footage.  For projects that have a smaller amount of video footage, you could archive it with everything else.  It’s a choice between how big you want the file size of the archive to be and how easy you want a restoration to be.

Where do we archive all of these files?  Two good options to consider when archiving your work are disk drives and network based storage.(Dropbox, for instance)  Like any digital backup/archiving plan for important materials, you’ll want redundancy and multiple locations.


How to archive in Final Cut Pro X

Now that we've established the "why" of archiving, let's dive into the "how" of archiving our work in Final Cut Pro X.  This workflow is based on the current version of Final Cut Pro X, which as of the time this article is being written is version 10.0.8.  As you’ll see, things get complicated.  With Final Cut Pro X’s new paradigm, there is currently not an easy, straight-forward way to back up *everything* for your project.  Novice Final Cut Pro X editors need to enter the rest of this article at their own risk as a few steps will be a bit complex.(definitely not as simple and easy as the Camera Archive feature)

One note before we begin: Projects (capital P) refers to a Final Cut Pro X timeline whereas projects (lowercase p) refers generically to the complete effort in creating a video.
 

  1. Delete All Render Files from the Events and Projects that you want to archive - No need to save your project’s render files as these can easily be re-rendered.  These files are large and will substantially save space in what you will need to archive.  Check out this video to see how to delete your render files in both your Events and your Projects.
     
    • Delete all (not just unused) of the render files from all of the Projects you want to archive
       
    • Delete all (not just unused) of the render files from all of the Events you want to archive
       
  2. Organize and Consolidate your Events and Projects if necessary - These two commands help to centralize all of your media.
     
    • Organize Event Files - If you want to copy all of your Event’s media (the actual files) to the Event’s folder, you’ll want to use this command.  This is useful if the imported media was linked to rather than copied into an Event.
       
    • Consolidate Project Media - If you want to centralize the location of all of a Project’s media (its Events) to the same drive, you’ll want to use this command.
       
  3. Delete Restorable Media and Optimized/Proxy Media - For media on memory cards or other physical media that you can easily re-capture or re-link later, delete the Original, Optimized and Transcoded Media Folders in the Event.  You’ll do this in the Finder.  Reference this Apple Knowledge Base article to guide you in locating the folders.
     
  4. Create a Sparse Disk Image to store a project’s Events and Projects - With this step, you’re essentially setting up a virtual drive that you will copy your project’s Events, Projects and other files to for archiving.  This Sparse Disk Image will eventually be one file that can be opened up and seen as a virtual drive in the operating system.  I first saw the great idea of using Sparse Disk Images for archiving from Ripple Training.(Steve and Mark are great trainers and produce wonderful training material.  Highly recommended.)  Click here  to see a step-by-step on how to create a Sparse Disk Image.
     
  5. Duplicate Projects and Events to the Sparse Disk Image - You’ll now make a copy of your Event(s) and Project(s) onto the virtual disk.  You’ll want to do this within Final Cut Pro X and *not* within the Finder.  Here’s where things can get tricky: how many Projects and Events make up your work?

    Let’s cover each case:

     
      1. One Event and One Project - This is the most simple case and the easiest to archive.  You’ll want to make a duplicate of your Project onto the new sparse disk image and then have the referenced Event moved as well.  For this case and the following cases, you’ll also be faced with the choice of duplicating all clips in an Event or only the clips you used in the Project.  Your choice will depend on how much you want to archive for the future.
         
      2. One Event and Multiple Projects - This is relatively simple.  Follow the steps of duplicating one of the Projects and moving its associated referenced Event to the sparse disk image.  Then, make duplicates of the remaining Projects to the sparse disk image.
         
      3. Multiple Events and Multiple Projects - This is where things get complicated!  Simply put, you’ll want to duplicate every element from every Event for every Project.(ideally without duplicating elements)  There’s not a simple command to do this however.
         
        • If you easily know all of the Events that are referenced in all of the Projects and are fine to back up everything, do that.  This “save everything” approach will be less hassle, but more costly in terms of the space needed for archiving.  For instance, if you created four Projects and all four Projects only referenced three Events, duplicate the four Projects and the three Events to the virtual drive.
           
        • If your multiple Projects reference an assortment of Events, your best bet is to archive each Project as if it stands alone.  This is potentially not as efficient as media would be duplicated, but it is a way to simplify the process.  When you duplicate a Project, you’ll want to make sure to duplicate the Referenced Events as well.
           
  6. Backup Motion Templates (Effects, Titles, Transitions, Generators) - This is the hardest part of the current workflow for archiving.  There is not a way to do this within Final Cut Pro X and it will potentially require a lot of work in the Finder.  It is particularly difficult given that you can’t just go to the separate sub-folders for the Motion Templates and copy them over.  You could potentially have referenced custom templates across many folders.  It can get messy quickly.

    The most logical way to handle this is to give your project a category when publishing any custom templates.(for instance “Bob’s Project”)  Then, you can find the “Bob’s Project” folder within each of the Motion Templates sub-folders to duplicate.  To archive these elements, create a Motion Templates folder in the Sparse Disk Image and copy everything there.  You’ll want to adhere to any distribution rights regarding moving third party templates around.

     
  7. Backup Associated Files - Within the Finder, create a folder or folders for all of your associated files on the virtual drive.  This could include:
    • Word/Pages/Numbers/Keynote/Powerpoint Documents
    • Photoshop/Pixelmator files
    • Fonts
       
  8. Unmount and Store the Sparse Disk Image - Now, you’ll want to exit Final Cut Pro X and unmount your virtual drive (or sparse disk image).  You now have everything bundled up for archiving on to a drive or on to a network backup.
     

Complicated, eh?


The Future

Looking forward, what improvements can be made to archiving your work in Final Cut Pro X?

  • One button Archiving!  A solution that gathers up the Motion Templates used in the Project would be of immediate need.  Editors will need to transfer projects between systems and they need to make sure that they can restore exactly what was created.
     
  • Project Bundle/Project Folder - What about archiving multiple Projects at once?  Perhaps what’s needed is a Project Bundle, where one can put several Projects.  Then, archiving becomes a bit simpler if the bundle can be duplicated along with any referenced Event from any Project in the Bundle.  Perhaps the “Bundle” is already there... in the Project Library with the use of folders.  

I think archiving improvements all come down to applying Apple’s great skill in simplifying the user experience.  They’ve already made great strides in simplifying and improving the editing experience with Final Cut Pro X.  Now, let’s hope some strides are made in easily archiving your video projects.


For more from Bascomb Productions, subscribe to the YouTube channel or subscribe via Twitter.


Copyright 2013 - Bascomb Productions


Posted
AuthorBascomb Productions

Do you need to show two videos on the screen at the same time in Final Cut Pro X?  Check out this video to see how you can create a picture-in-picture.

The version of Final Cut Pro X used in this tutorial is 10.0.8, but this technique will work in previous versions as well.

Looking for a little more visual separation between the smaller clip and the larger clip?  Add a Drop Shadow Effect to the smaller clip.

For more from Bascomb Productions, visit the YouTube channel or subscribe via Twitter.

Got requests?  Send in your suggestions via a YouTube message or via the website's contact page.

Copyright 2013 - Bascomb Productions

Posted
AuthorBascomb Productions

How can you fade to white in Final Cut Pro X?  Check out this video to see how you can use the Bright White Generator and a Cross Dissolve to fade to white in your video project.

The version of Final Cut Pro X used in this tutorial is 10.0.8, but this technique will work in previous versions as well.

For more from Bascomb Productions, visit the YouTube channel or subscribe via Twitter.

Got requests?  Send in your suggestions via a YouTube message or via the website's contact page.

Copyright 2013 - Bascomb Productions

Posted
AuthorBascomb Productions

How can you quickly animate a series of words in Motion?  Watch this video to see how you can use the "File" Text Generator in Motion.

The version of Motion used in this tutorial is Motion 5.0.7.

For more from Bascomb Productions, visit the YouTube channel or subscribe via Twitter.

Got requests?  Send in your suggestions via a YouTube message or via the website's contact page.

Copyright 2013 - Bascomb Productions

Posted
AuthorBascomb Productions

A few more thoughts have popped up since my blog post about what I would like to see in the next major revision of Final Cut Pro X.

So, without further ado, here are some additions to my recent list:

iCloud.jpg

Integrate iCloud

Cloud services are not to the point of easily storing everything for video editing in the cloud for a professional user who might work on several projects with a lot of footage, but... I think there are some things that could be stored in iCloud that would allow Final Cut Pro X to start using the cloud.  Those things could be:

  • Destinations and any associated logins/passwords
  • Roles
  • Keyboard Groups
  • The Project Library (aside from the media and render files of course)
  • Custom Effects (and custom settings for effects)


Versioning of Projects

It would be great if Final Cut Pro X could utilize OS X’s versioning for files, where a user can go back in time to recover a previous version of a document.  This could be valuable for editors.  Maybe it could even lock down and identify specific cuts (e.g. “First Cut”, “Second Cut”)

Timecode Reader Effect

There’s a real need for professionals to have a Timecode Reader Effect, which would show the timecode from the original media that the video was recorded on.  I still have a need to deliver window burns (video with burned in timecode) to clients so that they can refer to the original footage for editing notes or suggestions.  Right now, I don't have a solution for this.

Custom Shape Mask

The circular mask works great for a lot of color corrections, but being able to draw a custom shape with control points and Bezier handles like in Motion would really make color correction more powerful.  I believe this can be done by third party products, but it’d be great to have it built in to the software.


Setups for Window Layouts

I would love to have presets for Final Cut Pro X window layouts, just as previous versions of Final Cut Pro did.  ​Being able to quickly move between a color correction setup, a keywording/Event setup and a Project Library/Timeline setup for editing would be great. That would make me a faster and more efficient editor.  Dragging the edges of windows around to make the right layout is easy, but something I don't wish to do often.


For more from Bascomb Productions, visit the YouTube channel or subscribe via Twitter.


Posted
AuthorBascomb Productions